Want to change your outlook signature?
Changing your signature in Outlook is a simple process, and can be accomplished in as early as 2 minutes.
In this step-by-step guide, I will show you how to update your email signature in Outlook manually and add style and substance to your internet-powered conversation.
If you’re an individual or business looking for a fast, efficient and secured email service that can be accessed using most devices, including phones, then one of the best choices around is Outlook.
The Microsoft product is also available with Office 365, and best of all anyone can create an account and get started immediately for free. Using Outlook for some time now – for both work and life – I can confidently tell that it makes communicating with friends and colleagues effortless, and anyone – no matter the digital maturity level – will find it uncomplicated and highly useful.
There are a number of ways to make Outlook customized to your needs and more efficient. One way is to create email signature.
An email signature can make your online conversation look more professional, increase brand awareness, provide social proof of your work, can drive direct traffic to your website, and most importantly makes you own your email 🙂
But how will you go about setting up and/or changing your Outlook signature?
The process is very simple, and should finish quickly. Here I am mentioning the steps to change your Outlook signature on Office 365.
How to change Outlook Signature?
Step-by-step process with screenshots
- Sign in to your Outlook for 365 account

2. Click “Settings” (Gear Icon) located at the top right side of the screen.

3. This should reveal the Settings options.
Scroll down to locate the “View all Outlook settings” option

4. In the “Settings” window, just under the “layout”, there is the “Compose and reply” option. Click on it to reveal the email signature box.
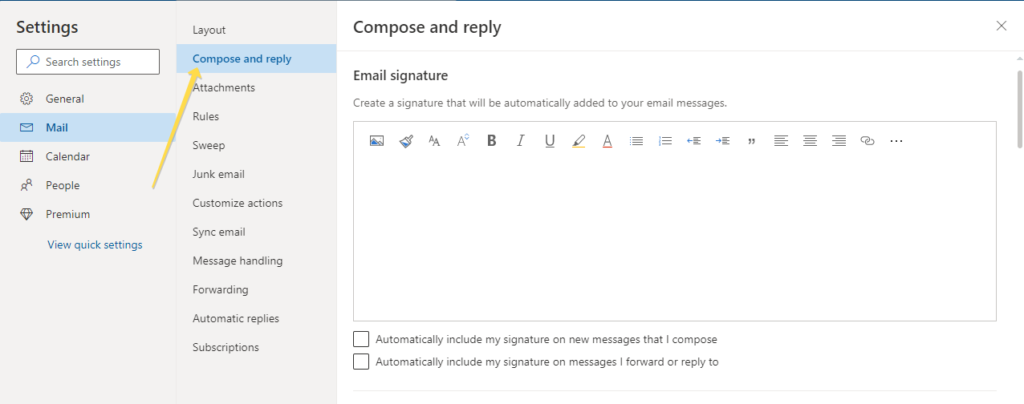
5. Now, add your desired signature. Please visit the FAQ section to know what to add in an email signature.
If you want to change an existing signature, just delete the present content and replace it with new ones.
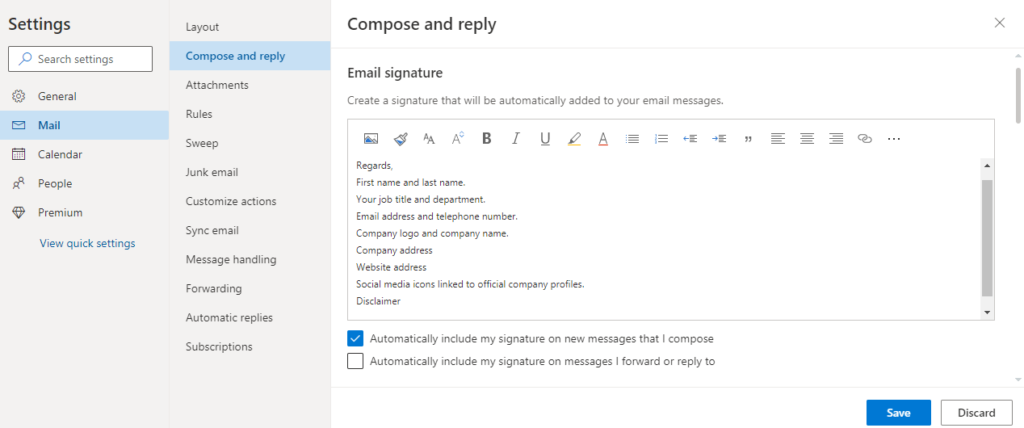
6. Finally, if you want this signature to be automatically added at the end of every email that you send, check the box titled “Automatically include my signature on new messages that I compose”.
7. Finally click the “Save” button.
From now onwards, all emails sent from your Outlook account will go with your newly added signature.

Want to watch the steps to change Outlook signature? Here is the video.
Step-by-step process (video version)
Before you watch the video – This video is not a work of perfection. It has several flaws, like the steps could have been explained using the audio and better presentation of the content, but I expect you wouldn’t mind because it solves the issue we’re trying to solve 🙂
I used VLC to record the computer screen. YES, VLC has a screen recorder option too. I am planning to write an article on it to solve the issues people struggling with screen recording options face. A few days from today, I will replace this video with a better one 🙂
Here is the video of how to add/change Outlook signature
That’s it.
The entire process of adding and/or changing Outlook signature is easy.
Here are a few common questions you may find helpful
Now, what if you want to style your Outlook signature using different formatting features available within the service? Let’s take a look!
How to style an Outlook signature before changing it?
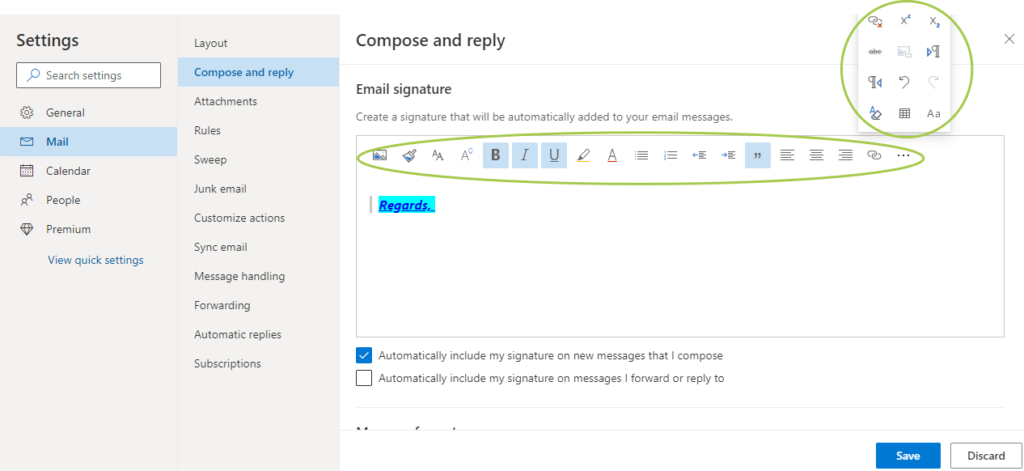
By default, Outlook’s email editor has built-in options to beautify your signature.
You can –
- Insert picture inline
- Format painter
- Change font
- Change font size
- Bold, italic, underline, highlight, and change the color of the text
- Add bullets and/or numbers
- Increase or decrease indent
- Add quote
- Align right, left, or center
- Insert and remove hyperlink
- Add strikethrough
- Add superscript, subscript
- Add alternate text
- Set text right-to-left or left-to-right
- Undo/redo
- Remove formatting
- Insert table and
- Change case
You can also add email signature template from third party services, but I personally like adding on my own. It retains originality and does not unnecessarily make the whole thing bulky.
Here is the image showing the formatting options in Outlook
FAQ
Generally speaking, your first and last name, job title, email and phone number, company address, and logo, website address, links to social media profiles, and disclaimer. If you’re also using Outlook for non work related communication, adding name, and contact number (if needed) should suffice.
It depends on you. Although you can always change and edit your signature as and when needed, maintaining uniformity is expected in many scenarios. For example, having two different signatures to communicate with the same person can sometimes create confusion for the recipient.
Sometimes bugs may create issues from displaying Outlook signature properly. You can sign out, and log in again to see if it has solved the issue. Also, conflict in policy could also cause a signature from being shown.
Another reason for a signature not displaying could be that while editing your signature in the signature box, you have not checked the box titled “Automatically include my signature on new messages that I compose”. Please check it and see if you can see your newly added signature in the new email.
I hope this article helped you add/edit your Outlook email signature. A properly written and designed signature is just much more than your contact info. It is the reflection of your personality.
